
Create, track, edit, and delete your applications
Applications are the heart of e-kariyerim: each one has its own status, timeline, and (if available) job description.
Create a new application
- 1
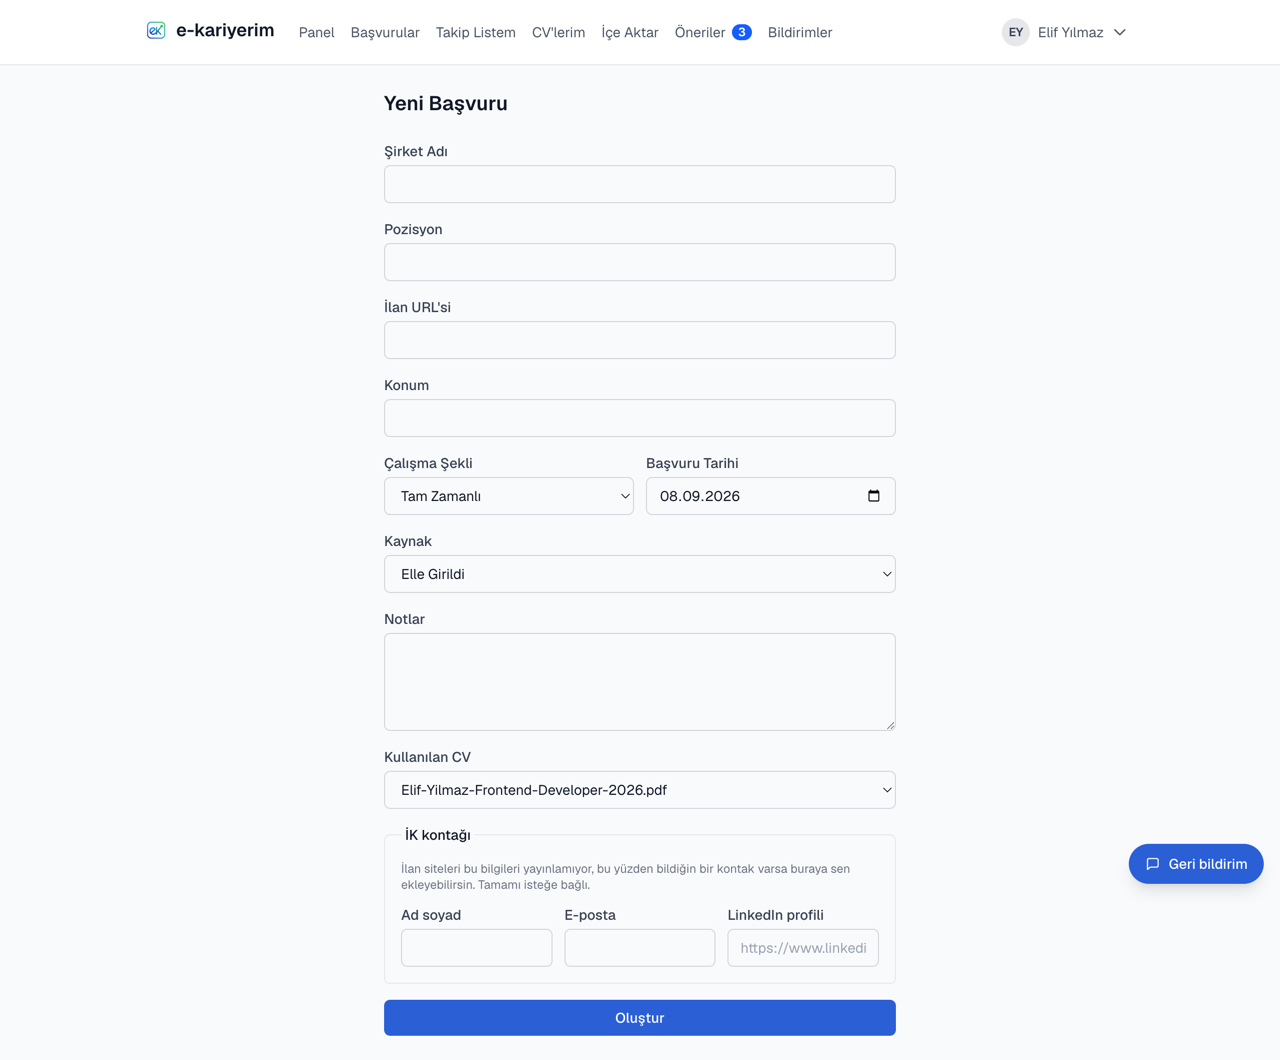
Click "New Application" from the Dashboard or Applications page
- 2
Start typing the company name
Companies you've added before are suggested as autocomplete; for a new company, just type it as-is. If you pick the company from the suggestions and you've applied there before, a "Your history with this company" box appears in the form: the job title, month and status of your three most recent applications there, with all of them one click away. It isn't a warning; applying again is fine. The box only appears when creating a new application and only shows your own applications.
- 3
Enter the job title, job URL, location, and employment type
The applied date defaults to today, but you can change it. When you paste the posting link and that posting is already in your list, a "You already saved this posting" note appears under the field: the saved application's role, when you applied, its status, and a link that opens it. The link is recognised even with the tracking parameters your address bar adds. It does not stop you: if you really are applying again to a reposted job, carry on and save.
- 4
Optionally add a source, a CV and notes, then save
The source field can only be chosen when creating — it can't be changed later. If you have files on the My CVs page you can record which one you applied with; your default CV arrives already selected.
List, search, filter
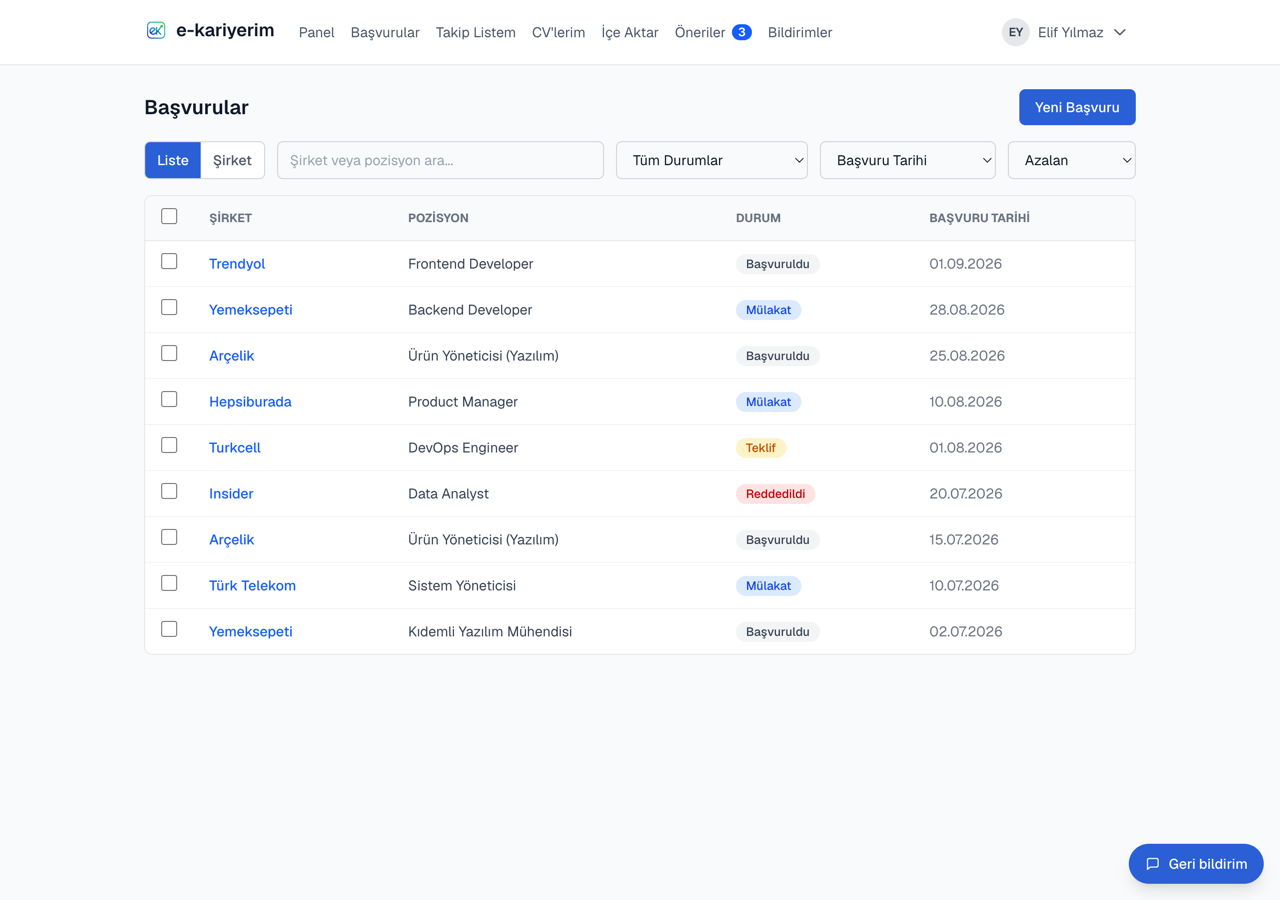
The Applications list is paginated (10 per page) and supports searching by company/title, filtering by status, and sorting by date/company/title/status — all your filters are reflected in the URL, so you can share or bookmark a view.
Quick find: when someone calls
When a company calls out of the blue, you have a few seconds to remember which application it is. On any page while signed in, press Ctrl K (⌘K on a Mac), or click the shortcut button at the right of the search box on Applications, and type the company's or role's name. A summary of the matching application opens: role, status, when you applied, the CV you sent and its version, the HR contact, your note, a short passage from the posting, and your other applications at the same company. With more than one result, move between them with the arrow keys and press Enter to open the application. "Add a call note" takes you to the application's Timeline with the event form open, "Recruiter got in touch" selected and the note field ready.
Phones have no shortcut: type the company's name into the search on Applications. If every application found is at the same company, the same summary of your latest application there opens above the list. Quick find only ever searches your own applications.
Grouping by company
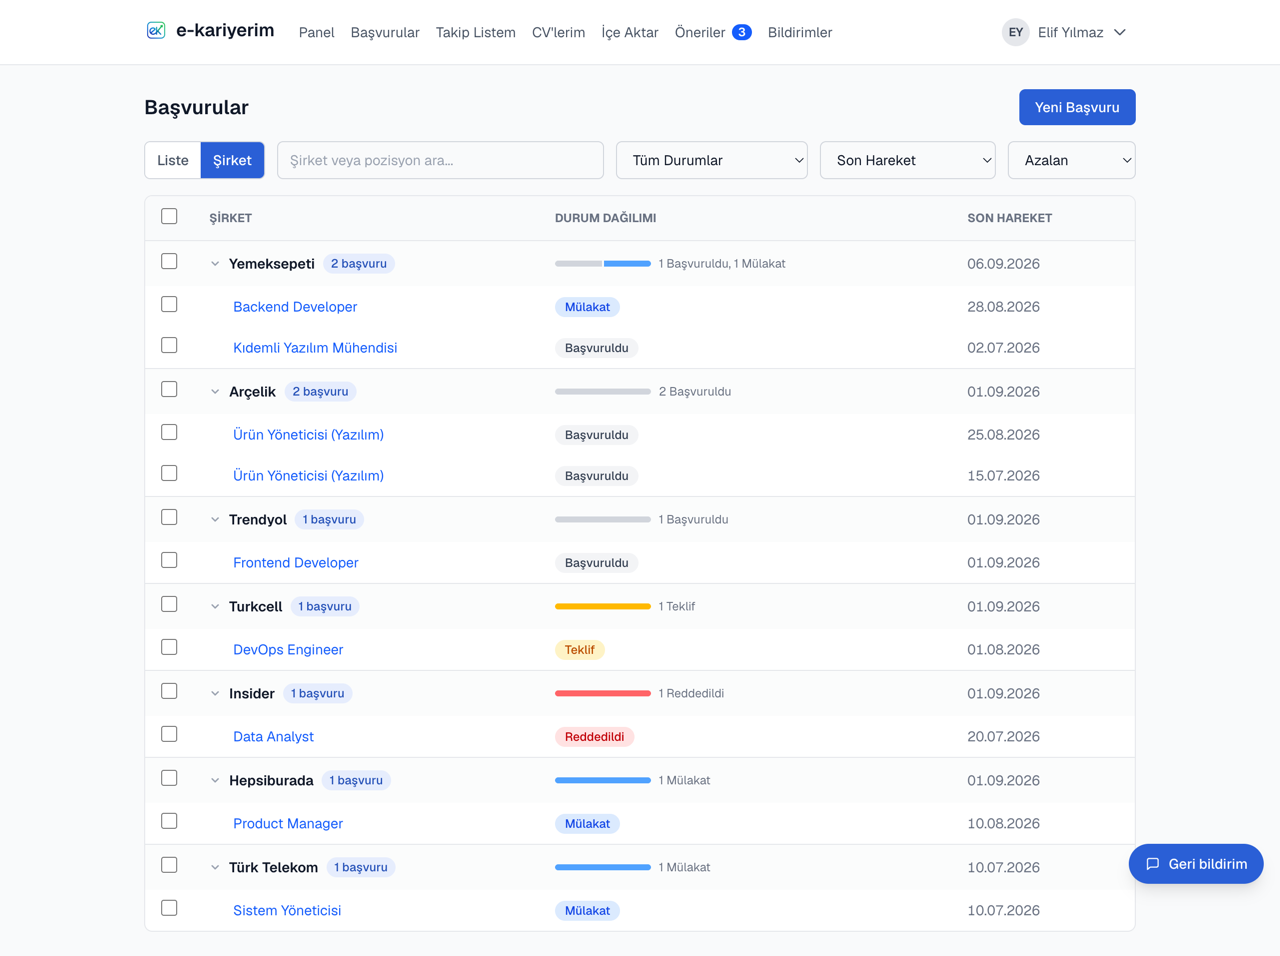
The List / Company switch above the list collects the same applications under the company you sent them to. In the company view a page holds 10 companies rather than 10 applications — so a company's applications are never split across two pages. Each company header shows how many applications you have there, how they are spread across statuses, and when something last moved; click the header to fold a group away, or use its checkbox to select all of that company's applications at once. Search and the status filter work the same way in both views, and the view you pick is reflected in the URL. If you have more than 20 applications at one company, the link under the group takes you to the flat list narrowed to it. The third view, the Board, shows your applications in columns by stage; see the Board topic in the help centre for details.
Acting on many applications at once
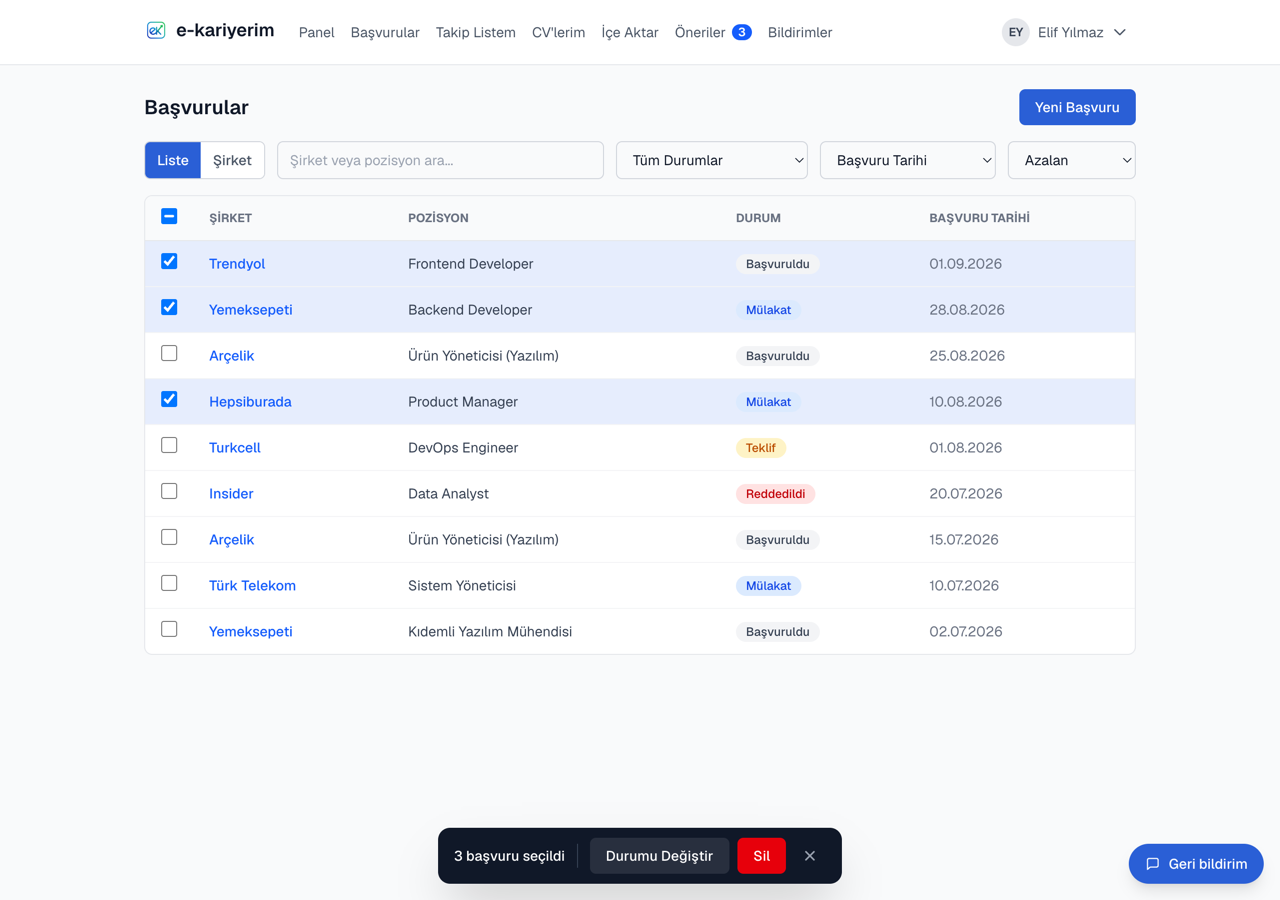
Tick the box on any row and an action bar appears at the bottom of the screen with two things you can do to the selection: change the status of all of it, or delete all of it. The box in the table header takes the whole page, and next to the count there is a link that reaches past it — every application the current search and filters match, not just the ten in front of you.
- 1
Select the rows
Row by row, a whole page at a time, or everything matching the filter. In the company view, the box on a group header takes that company's listed applications.
- 2
Pick an action from the bar
"Change status" moves every selected application to one status and can carry a note. "Delete" removes them.
- 3
Confirm
A status change asks once and tells you how many rows will actually move — applications already in that status are counted separately and left alone. Deleting asks for more: a tick to acknowledge it, and for "all matching" also the scope spelled out and the word typed in.
Undoing a bulk status change
After a status change, a strip stays on the list with an "Undo" button. It puts each application back where it was — except any you have moved on yourself since, which are left alone, because a decision you made later should win. The undo is added to each application's timeline rather than erasing the change it reverses: the mistake stays on the record.
A bulk delete cannot be undone
Application detail
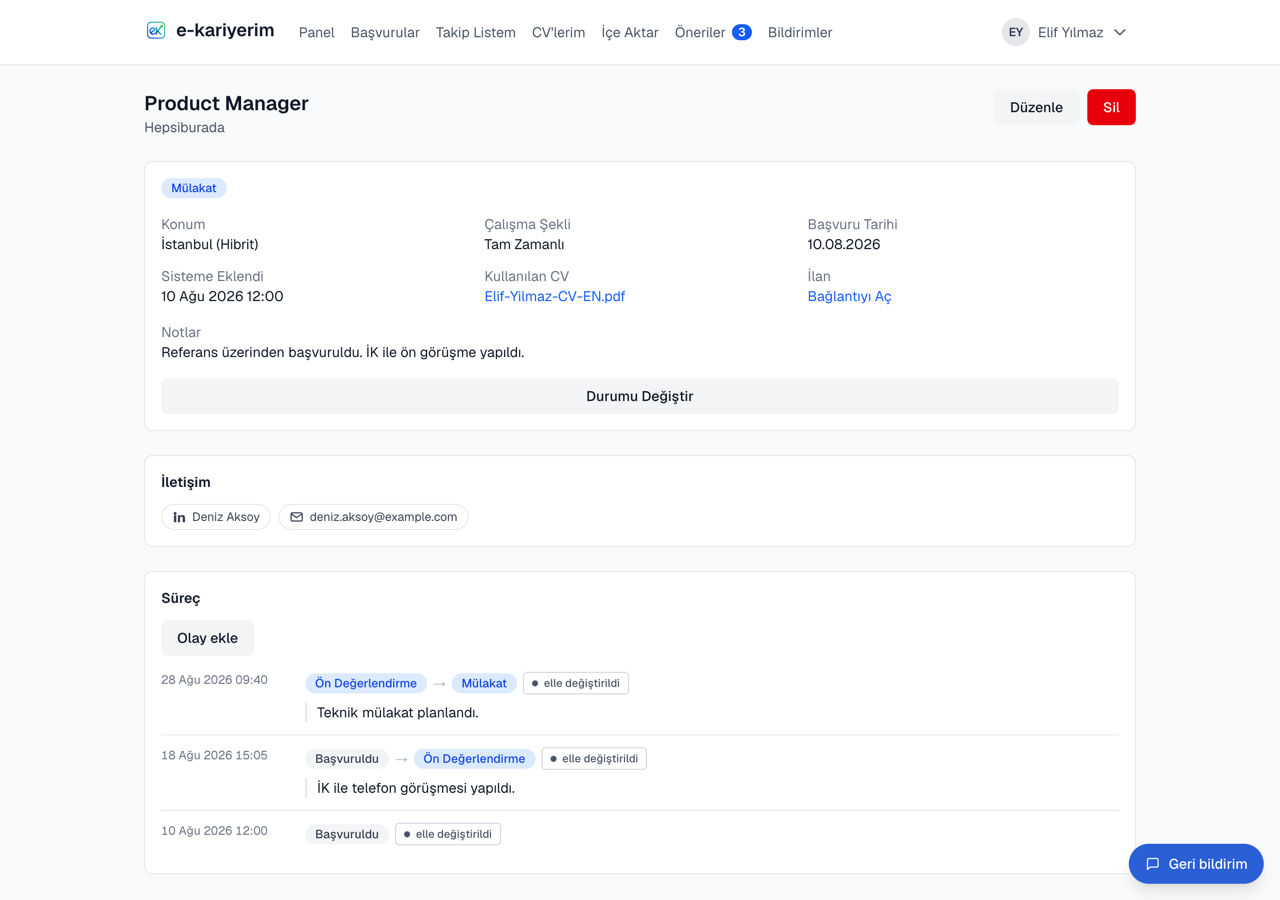
Opening an application shows its status badge, location, employment type, applied date, when it was added, the job URL (if any), the CV you recorded it with (and which day's upload it was) and your notes, with the Timeline and — if available — the job description below. Applications created automatically via Gmail Scanning show a "Created from Email" badge. An application still in progress also has a "Promised reply by" cell: the date the company gave, the stage it was given at, and how many days are left or have passed. Depending on the application, an "A quick reminder" box may appear too; when and what it shows is described in its own section below. If you uploaded a newer CV after an application that is still in progress, a note under the CV row says so: the company has the version you sent with that application.
Promised reply date
If they said "we'll get back to you by Friday", record the date when you change the status, or with "+ Add a date" on the detail page. No follow-up reminder comes before that date; if it passes and the application hasn't moved, the dashboard shows a "The promised date has passed" reminder. Once the application moves, the promise stays as "Kept their word" or "Replied late". These answers and how you learned of a rejection enter only aggregate rates (the sector table), without your name; no rate is shown until 5 answers from at least 3 people are in.
Interview date and "How did it go?"
When an application moves into screening or an interview stage you can enter the interview's date, time and format (Online, In person, Phone); for a date that arrives or changes later, use the "Interview" row on the details page. "Add to calendar" adds it to Google Calendar, or to Outlook and Apple Calendar with an .ics file; we never write to your calendar and never store the meeting link. The bell reminds you the day before, and after the interview the dashboard asks "How did it go?": pick the stage you moved on to, the reply time they gave you, or close the application as rejected. Every answer can be undone. Interview dates never enter any aggregate. If the company is in another time zone, entering the time asks "Whose time is this?": type the time from the email on the company's clock and its equivalent on yours appears right below. When the company's country is unknown, the same choice sits behind a small link. You may also note who you are meeting; the names show on the interview-morning card and on the next day's "How did it go?" row. That row opens a thank-you note draft (Turkish or English) addressed to those names; copy it and send it from your own email — we never send it.
Reminder to apply again
On a rejected application's page, a "Want a reminder to apply here again later?" box offers 3 months, 6 months or a year, or "No need". On the chosen day at 09:00 (the next working day if it falls on a weekend or public holiday) it appears on your dashboard in a "Time to apply again" card, with the reason given last time, when there was one, and a link to the company's openings. From there you can push it 3 months further or close it; a reminder you set can be cancelled on the application page with "Cancel". The question is asked once per rejection, and the card is hidden while your reminders are paused.
The "A quick reminder" box and postings that come down
An application's details page has an "A quick reminder" box built from your own data: things you may have forgotten that e-kariyerim did not. Only the lines that apply to that application appear, and when none apply the box is not shown at all.
The posting came down
Once a day we check whether the postings of your still-open applications from the last 90 days are still live; each posting is looked at no more than once every three days. The check covers applications whose posting is on LinkedIn, kariyer.net, Greenhouse, Lever, Ashby, Workday, Workable or SmartRecruiters. When a posting has closed, the box says how many days ago. On an application that has not had a reply yet (Applied), it adds that they have most likely moved on with another candidate. Once an application has ended, the line is not shown. The check carries only the posting's public address; nothing about your account, your cookies or you is sent, and the only thing stored is the date the posting closed.
How long you usually wait
While an application is still Applied, the box compares the days since you applied with your own usual wait: the median number of days it took to get a first reply on your earlier applications. It is worked out once at least 3 of your applications have had a reply. When the posting has come down this line is not shown; the closed line says more.
The posting's age and your earlier application
When the posting's publish date is known, the box says how old the posting already was on the day you applied. If you applied to the same company before, that application's position, month and status appear with a link to it.
HR contact and company links
Under "Contact", an application can hold the person to follow up with — name, email address and LinkedIn profile. You can type them in yourself; the extension fills them in from the hiring-team card when a LinkedIn posting shows one, and confirming an email suggestion adds the sender's address the same way. Beside it the company's own website, LinkedIn and kariyer.net pages appear, along with its industry and country once they can be worked out. All of it is yours alone to see — e-kariyerim never writes to that person on your behalf.
Editing
"Edit" on the detail page lets you update the job title, job URL, location, employment type, applied date, and notes. The company name and source can't be changed after creation.
Deleting
Clicking "Delete" on the detail page opens a confirmation dialog — nothing is deleted until you confirm. To clear out several at once, select them on the list instead (see "Acting on many applications at once").
Deletion can't be undone
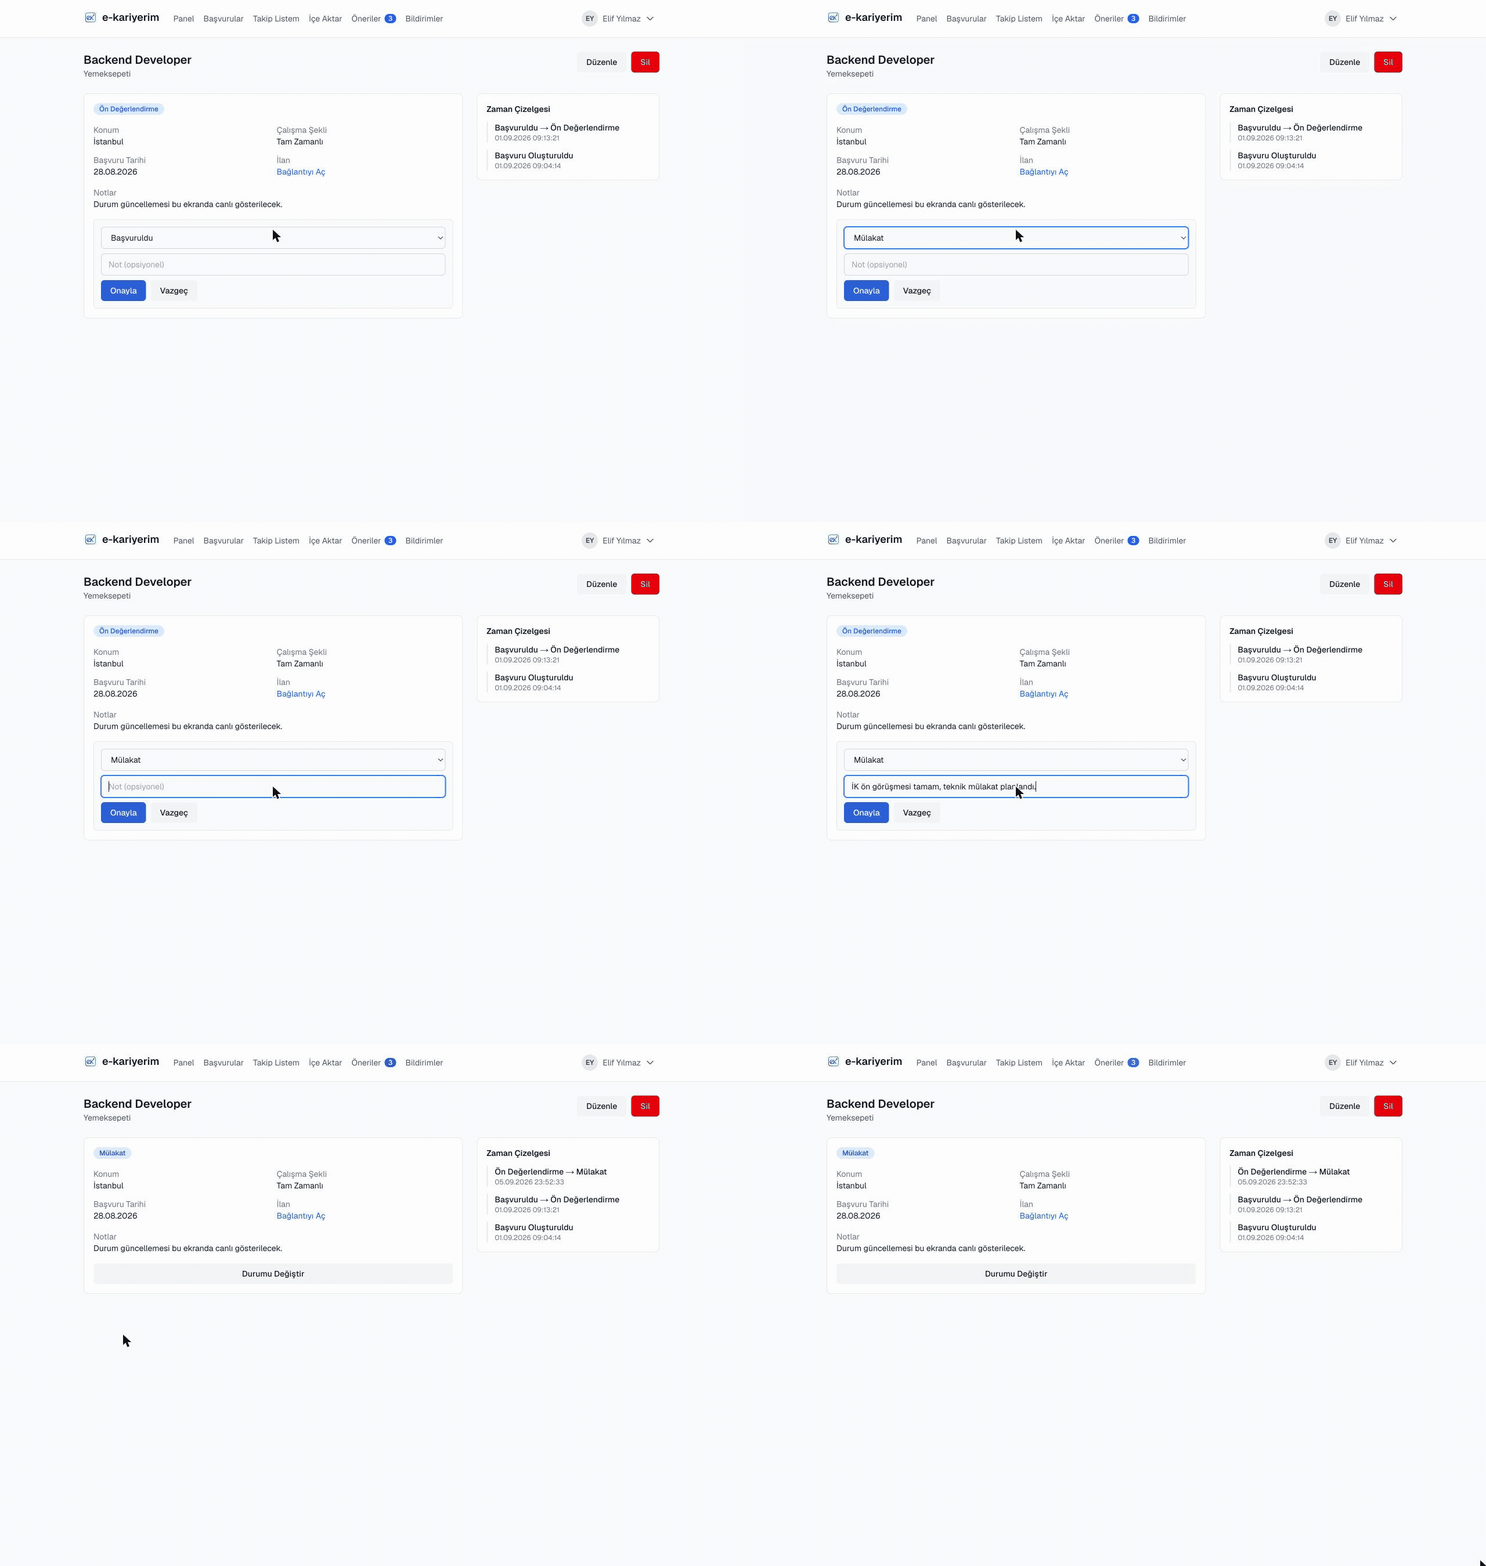
Changing status
- 1
Click "Change Status" on the detail page
- 2
Pick the new status from the list
Your current status doesn't appear in the list — only the statuses you can move to.
- 3
Optionally add a note and confirm
The change is recorded in the Status History section as "Old Status → New Status", together with your note, which appears under that row. Moving to a status still in progress, you can also enter the reply date the company gave; moving to Rejected, how you learned of it — both optional.
What do the statuses mean?
An application can be in one of these statuses: Applied, Screening, Interview, TechnicalInterview, FinalInterview, Offer, Accepted, Rejected, Withdrawn, Ghosted.
Timeline
The detail page gathers everything that happened to an application into one chronological list, newest first: every status change and every event you added yourself. A status row says which status it moved from and to, when, the note you wrote at the time, and — most importantly — how the change was applied: whether you changed it yourself, confirmed an email suggestion, changed it as part of a bulk action, or undid one. For a change that came from an email, the rejection reason and the originating email's subject can be expanded inline.
Adding an event yourself
Not everything worth remembering is a status change. "Add event" records things like a recruiter getting in touch, a screening starting, an interview being scheduled or completed, an offer arriving, or a follow-up you sent — with the date it happened and a short note. Leave the date empty and it is recorded as now. The event joins the same timeline without moving the application's status.